Table of Contents HIDE
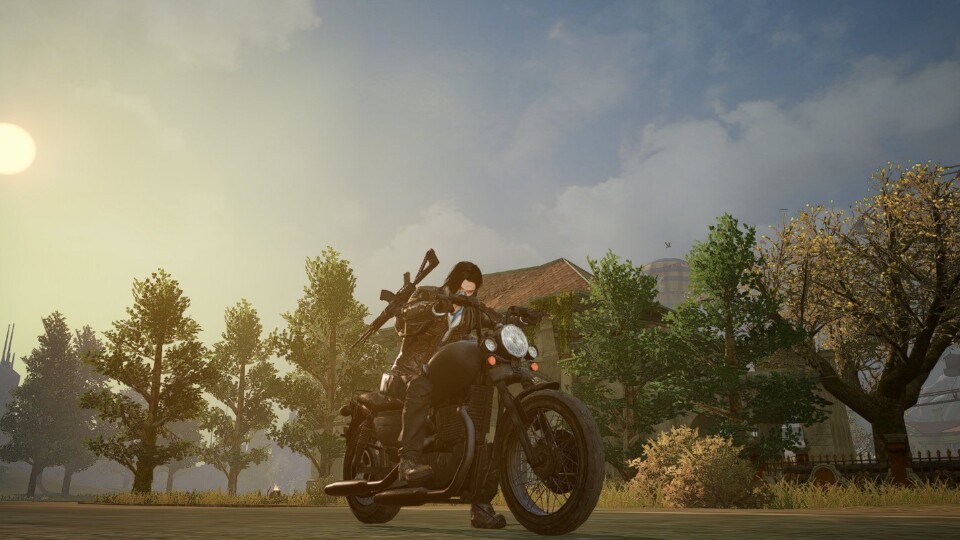
In Undawn, there are two types of vehicles: motorcycles and cars. Some vehicles can be crafted by every player, while others can only be obtained through donations. Vehicles can be modified and tuned, allowing you to fine-tune the behavior of your cars and motorcycles while driving. This is especially important during racing events like Race Extravaganza. In this guide, I will tell you everything you need to know about vehicles in Undawn and how to properly customize them.
How to Obtain Vehicles
There are two ways to obtain vehicles in Undawn: crafting them yourself using the Mechanic Station or purchasing them with RC (donation currency), including winning them in the Store → Supplies section. Vehicles purchased through donations are much more powerful than their free-to-play counterparts and have a more “premium” and distinctive appearance.
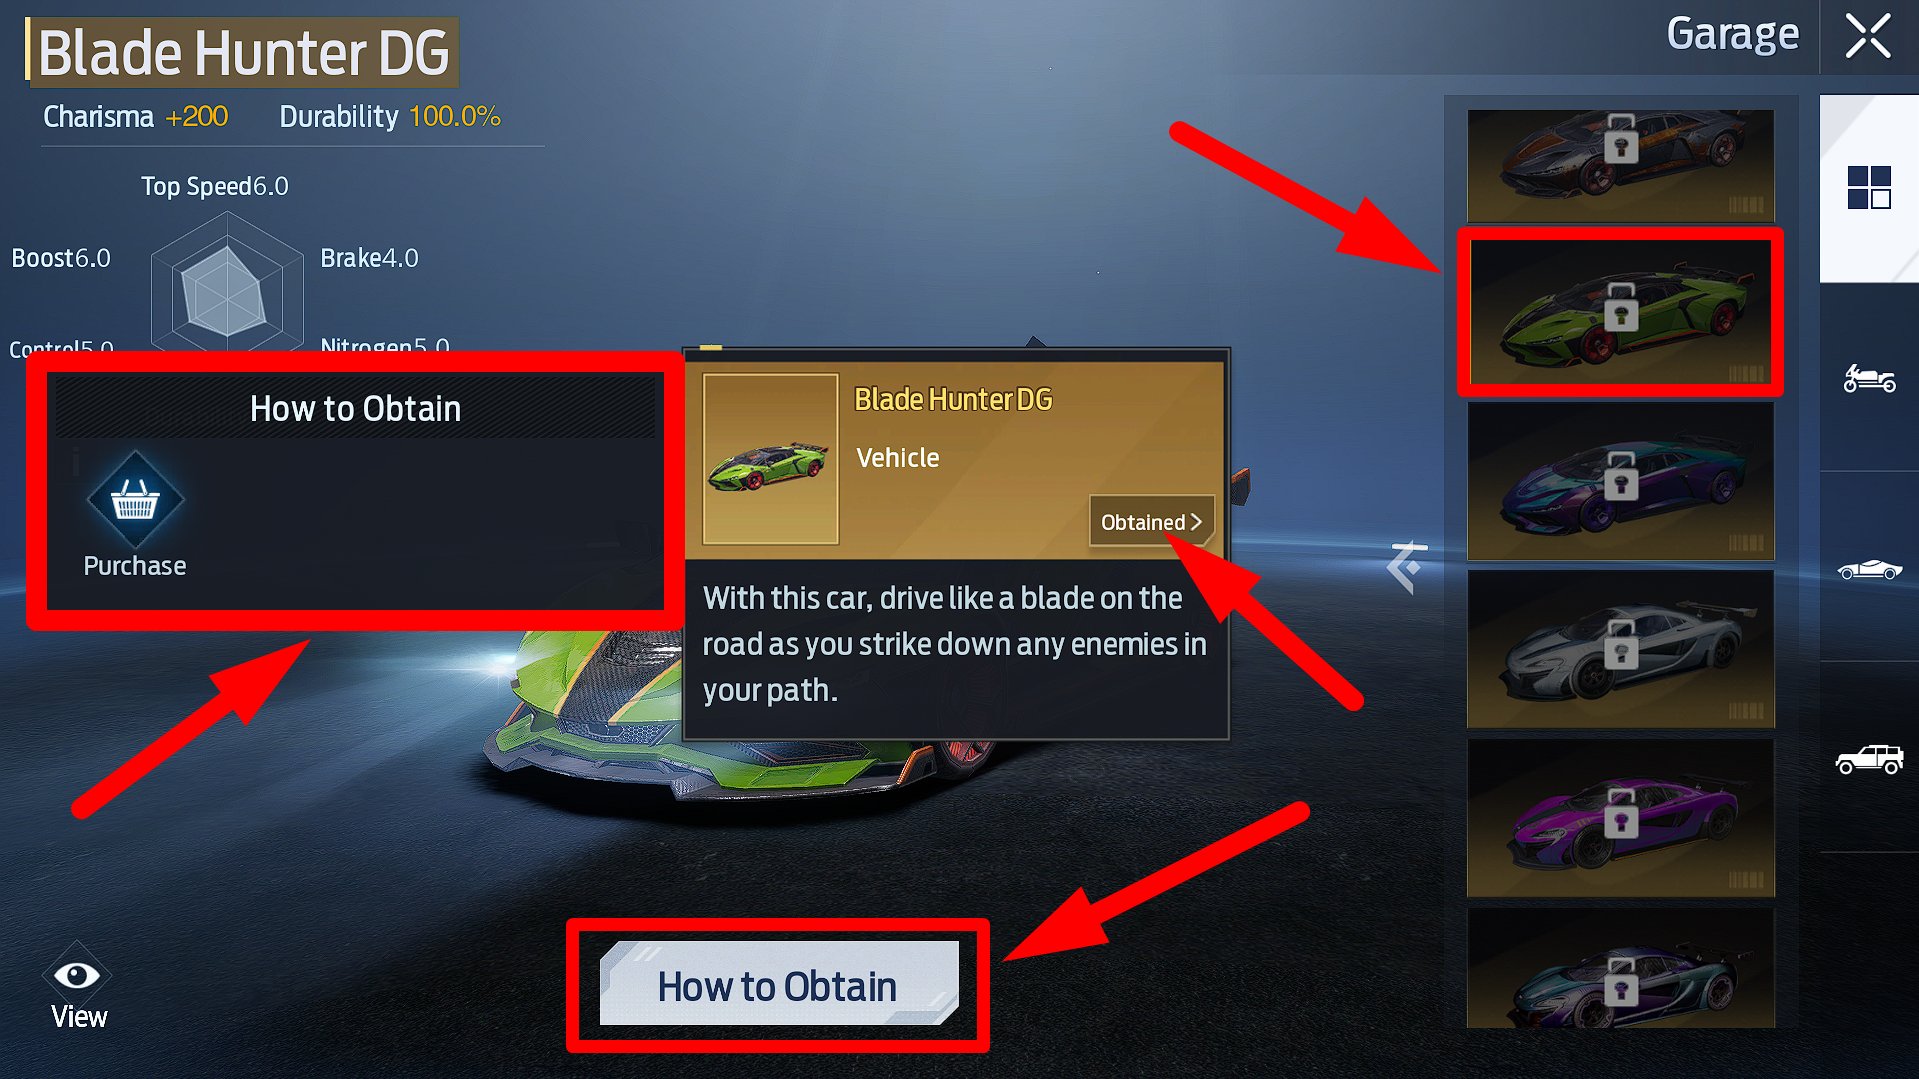
To find out how to obtain any vehicle in the game, follow these instructions:
- Go to the Esc → Vehicle → Garage section.
- Select any car or motorcycle from the list and click the “How to obtain” button.
- Study the information in the tooltip that appears.
Blueprints for cars and motorcycles that can be created with the Mechanic Station can be purchased in various in-game stores (Esc → Market).
How to Summon Vehicles and Switch Between Them
To summon a vehicle, press the “Tab” key. Your character will automatically take the driver’s seat. Pressing Tab again will make your character exit the vehicle.
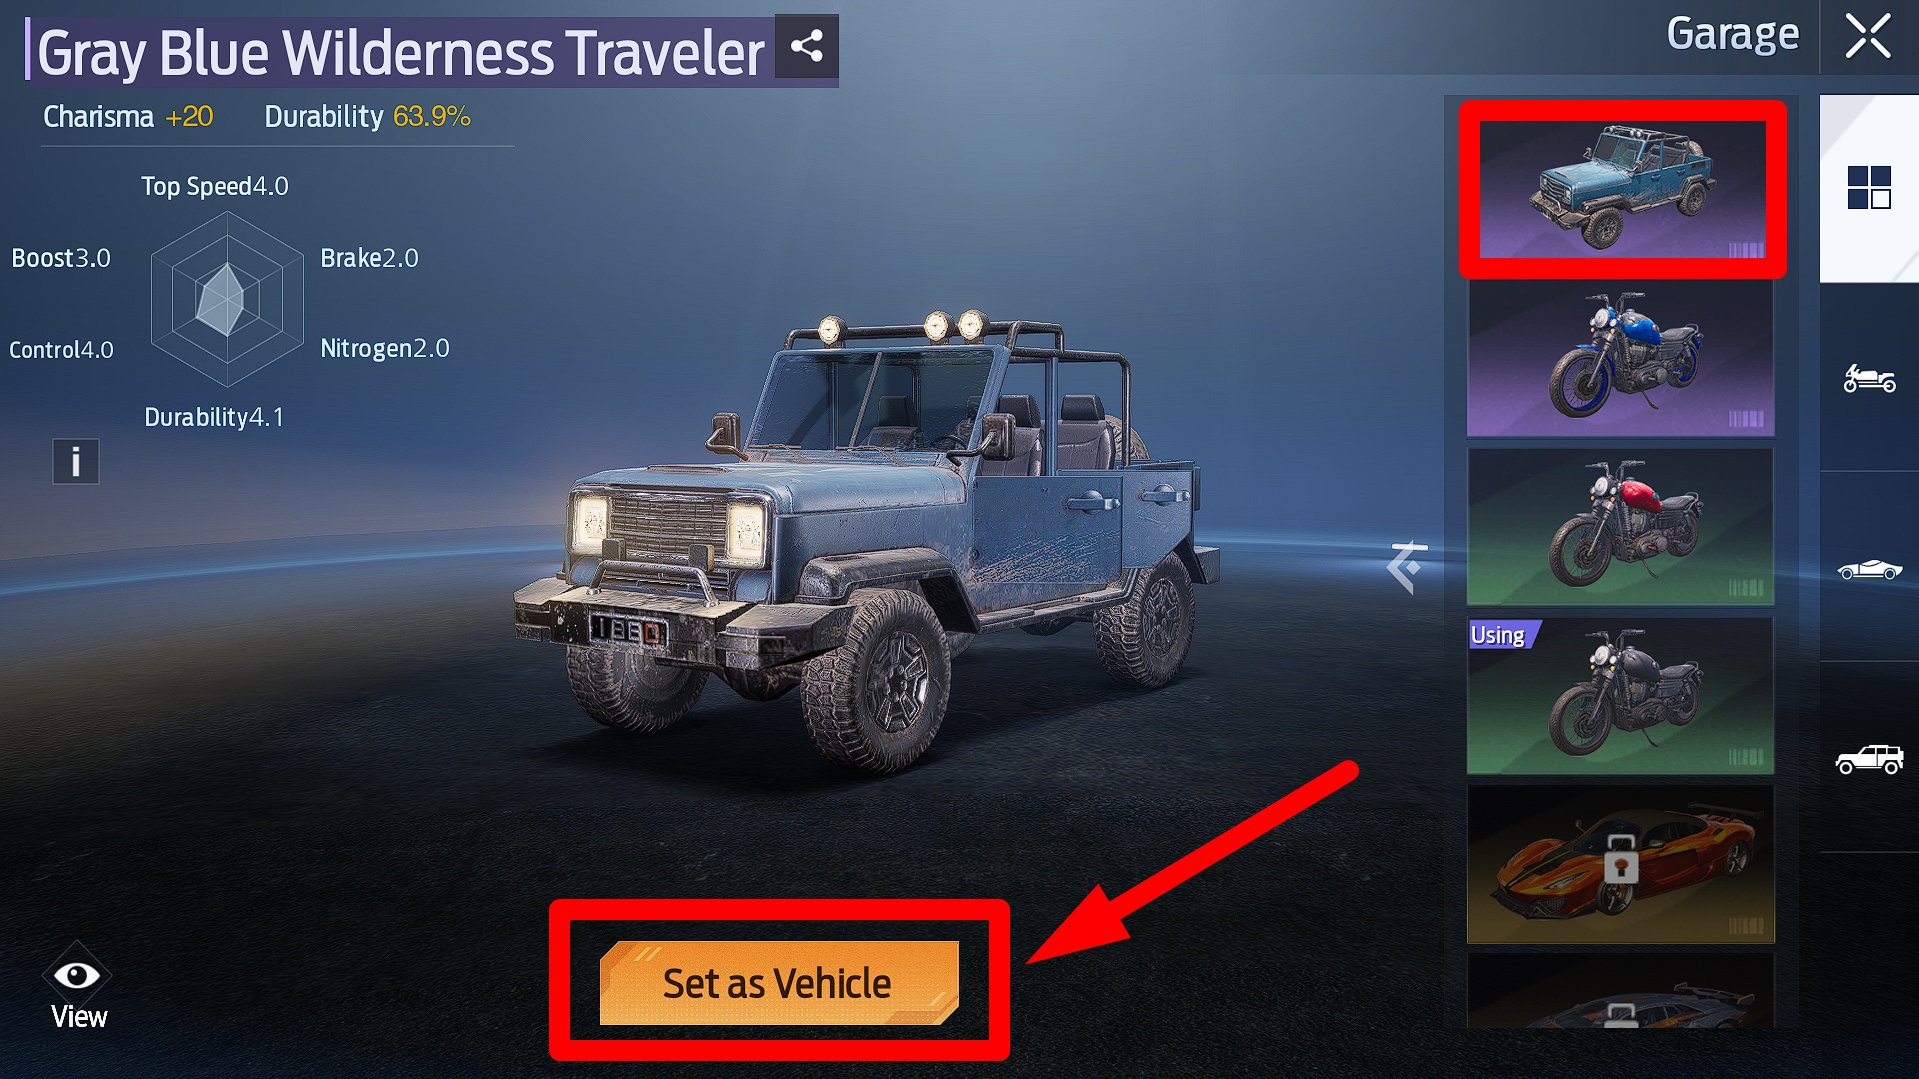
If you have multiple vehicles, you should choose one as your primary vehicle. It will be summoned by default when you press the Tab key. To do this, go to the Esc → Vehicle → Garage section, select any car or motorcycle you have, and click “Set as Vehicle.”
The second, faster way allows you to switch between vehicles and summon them simultaneously. To do this, click on the action icon (usually located near the chat window), press the “Vehicle” button in the bottom tab, and select the vehicle you want.
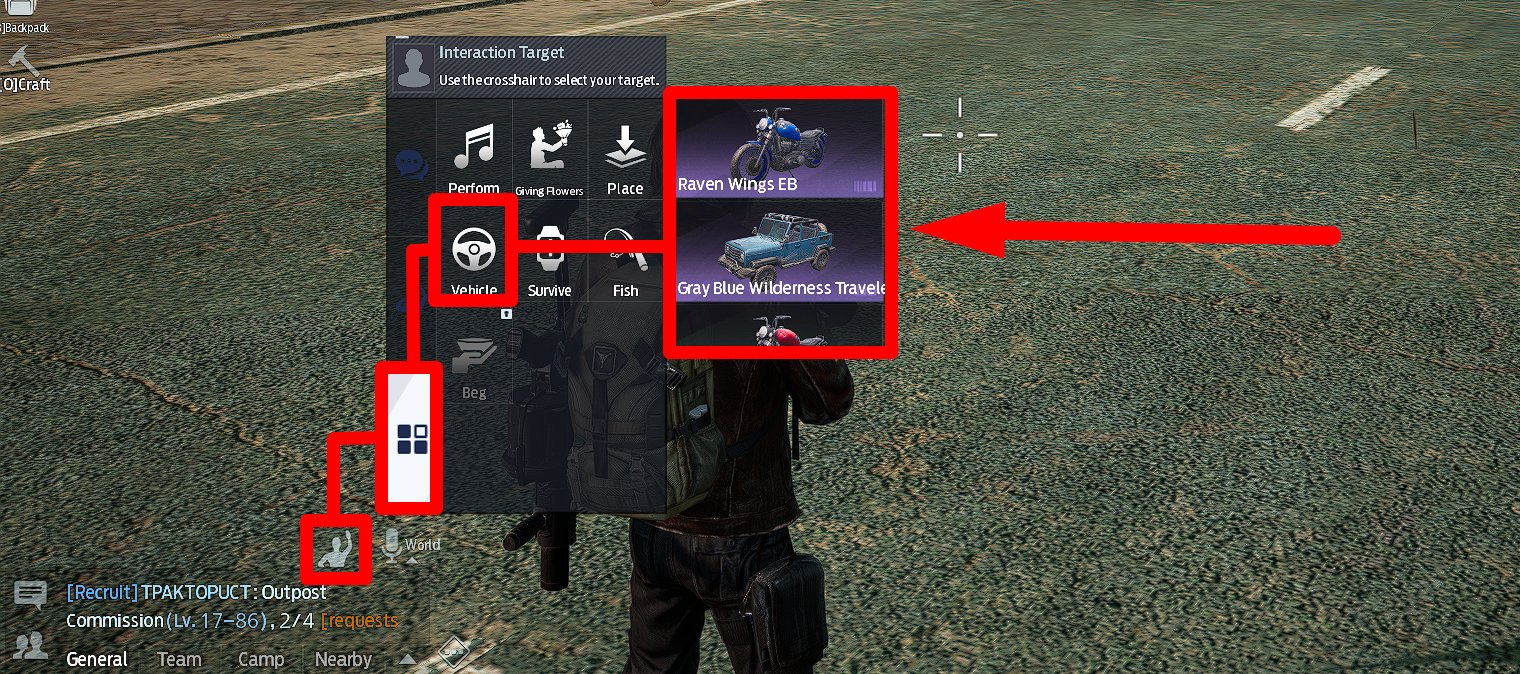
The selected vehicle will be summoned after your choice and will be summoned when you press the Tab key subsequently.
Customizing Your Vehicle
You can customize the camera behavior during driving in the Settings → Control (Driving Camera) section. PC players are recommended to choose the “Free Camera” mode, which allows you to freely rotate the camera around your character while driving.
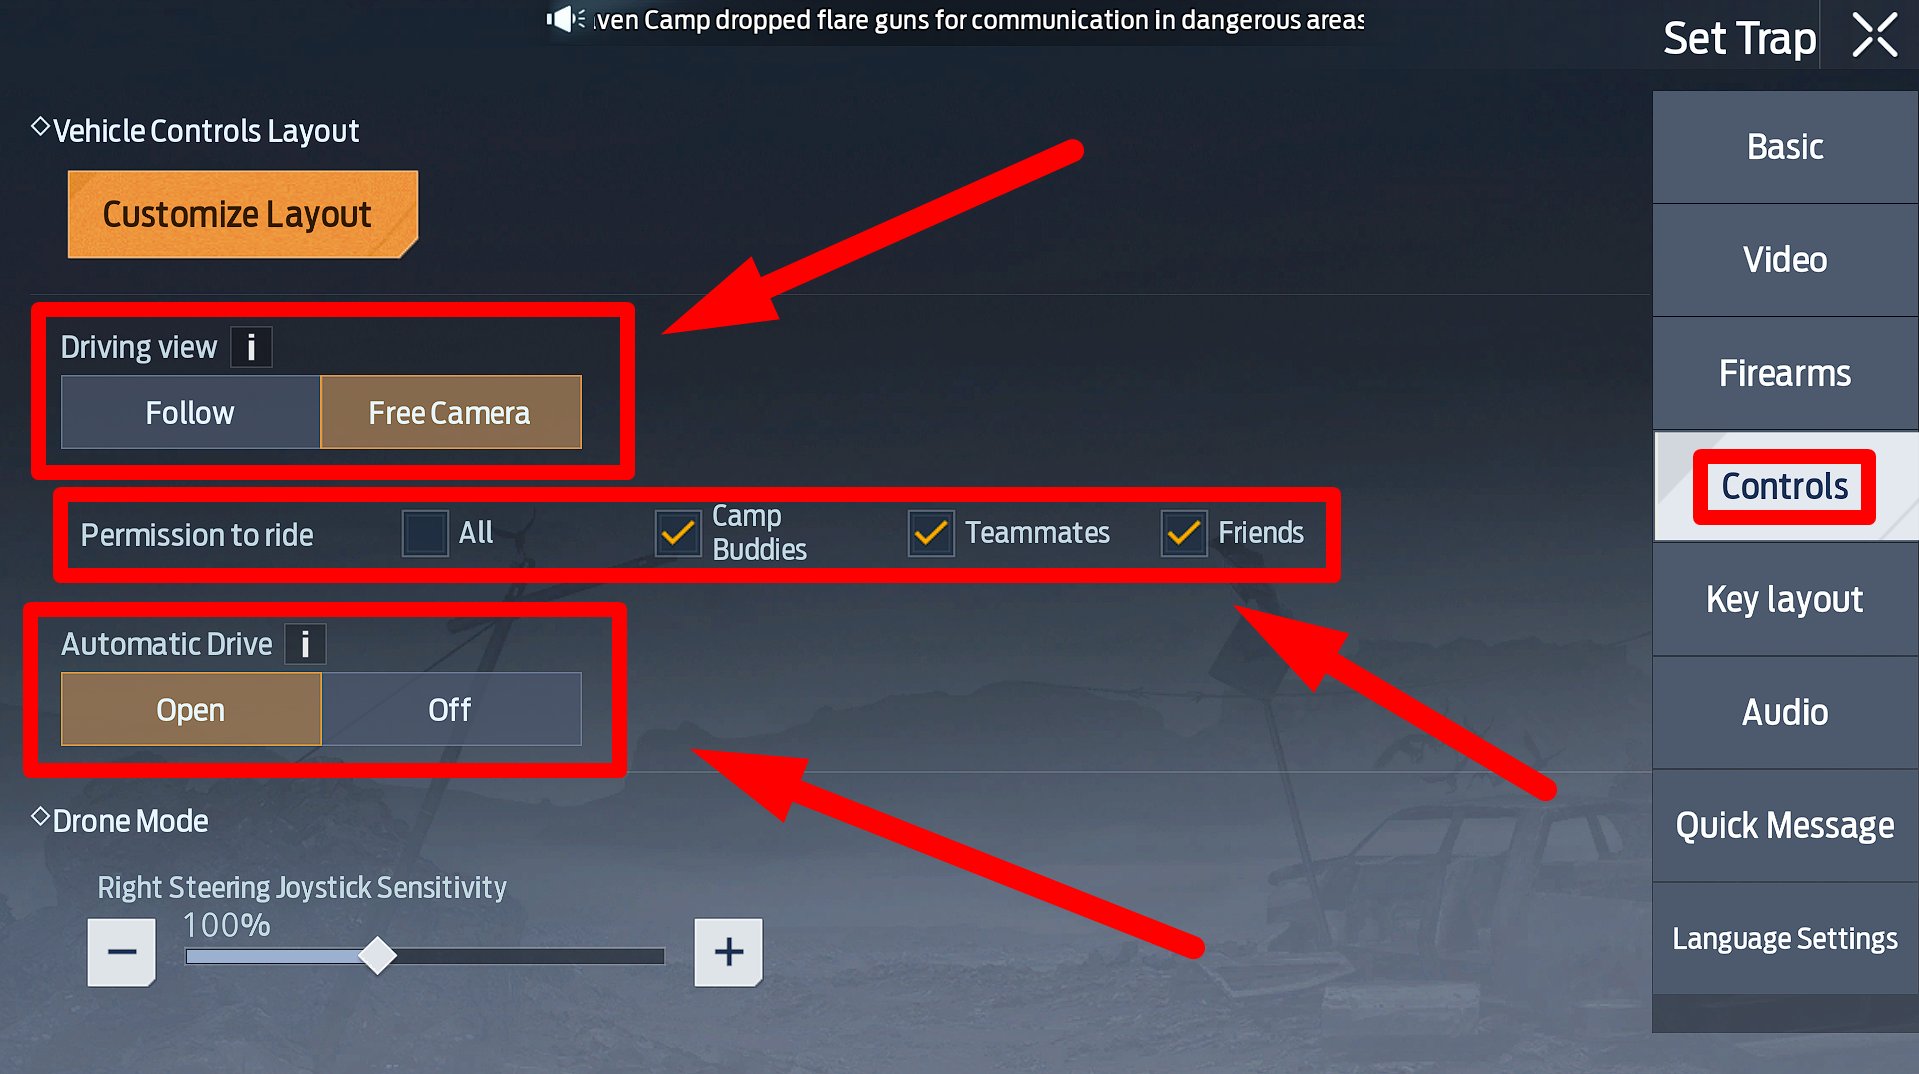
You can also restrict other players from riding your vehicle, allowing only friends, teammates, or camp buddies to access it.
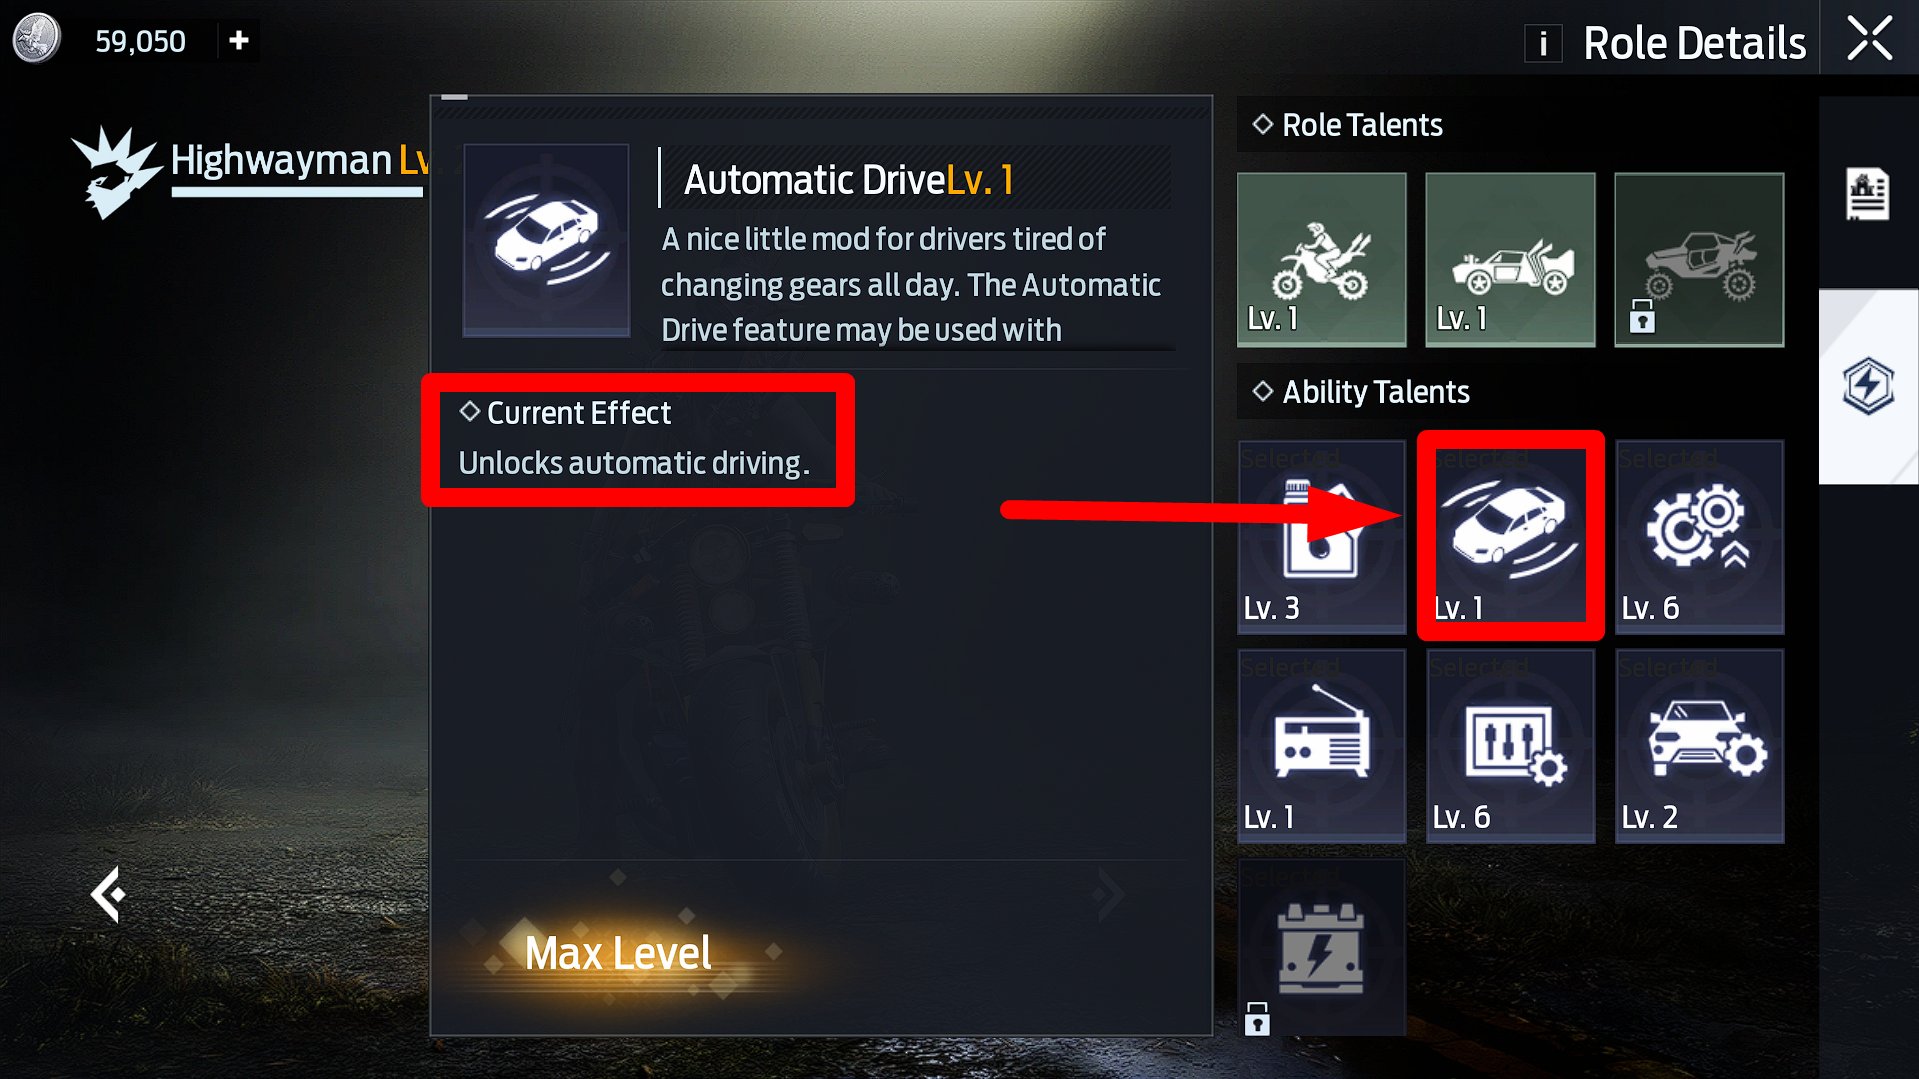
In one of the recent updates, the Automatic Drive feature was added, which, according to the description, works based on AI. This feature becomes available only after unlocking the “Automatic Drive” perk in the “Highwayman” role.
When this feature is active, you simply need to select a point on the map and press “Go” to initiate automatic driving.
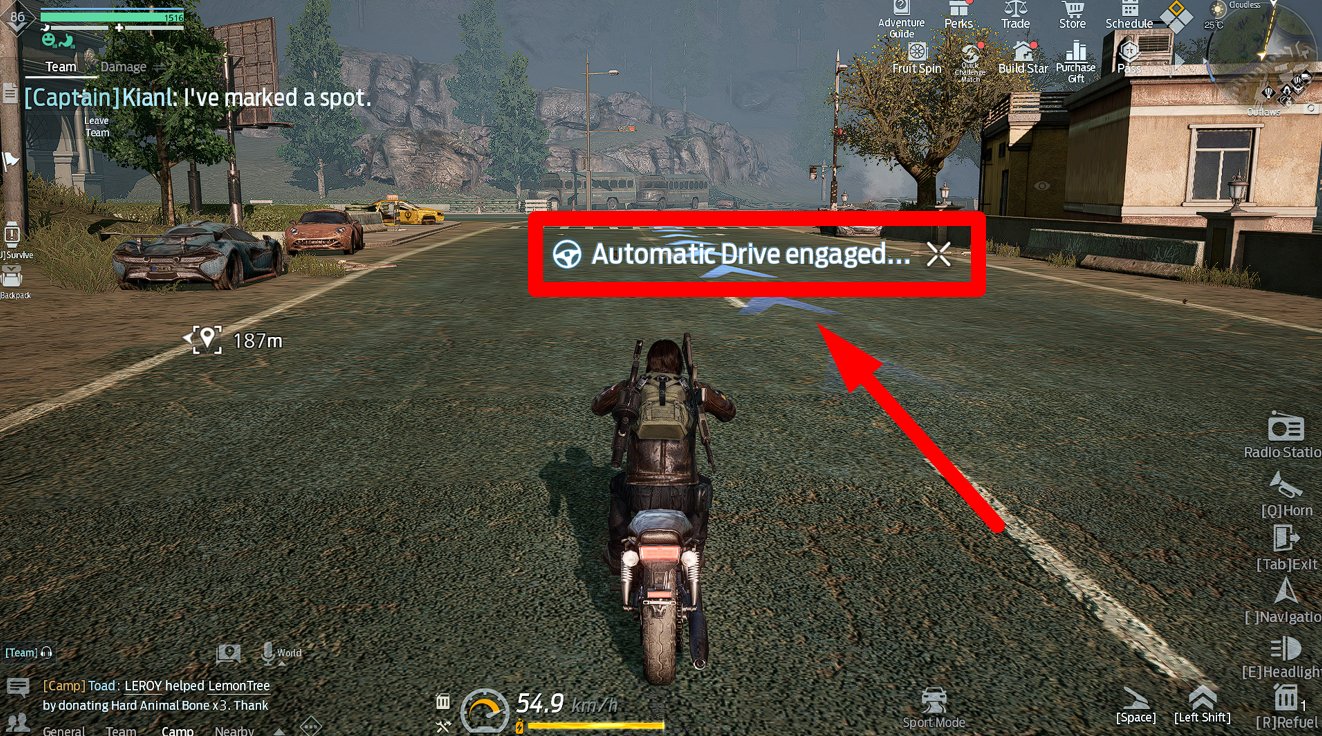
Your character will automatically summon your active vehicle when the system deems it necessary.
Vehicle Controls and Interface
Driving a vehicle in Undawn is done using the following keys:
- W-A-S-D: Movement controls
- Shift: Activate nitro boost
- Space: Apply manual brakes
- Q: Activate the horn
- E: Turn headlights on/off
- R: Refuel (requires Fuel in your inventory)
Please note that vehicles have two modes: “sport mode” and “comfort mode.” You can switch between them using a dedicated button in the interface (see screenshot). The current active mode is displayed on the button.

In “sport mode,” your vehicle will drive much faster.
Vehicles also come equipped with a “radio,” essentially a music player with multiple tracks. The radio becomes available only after unlocking the “Mobile Radio Station” perk in the “Highwayman” role.
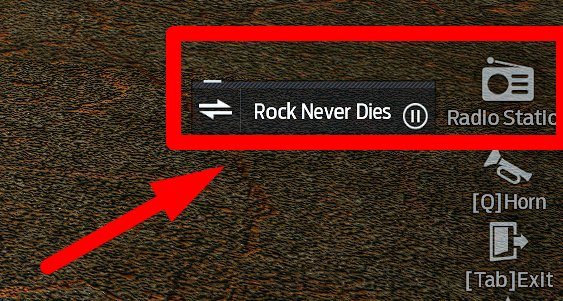
Click on the radio icon, select a station, and play music. Make sure that “Music” is enabled in the Settings → Audio section, or you won’t hear anything while driving.
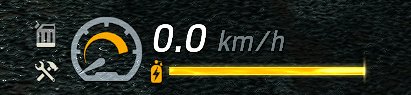
While in drive mode, you can see the following main vehicle indicators:
- Current speed (km / h)
- Nitro gauge (yellow bar at the bottom)
- Fuel icon
- Vehicle durability icon
How to Modify Vehicles
The ability to modify specific vehicle parts becomes available after unlocking the corresponding levels of the “Vehicle Modification” perk in the Highwayman role.
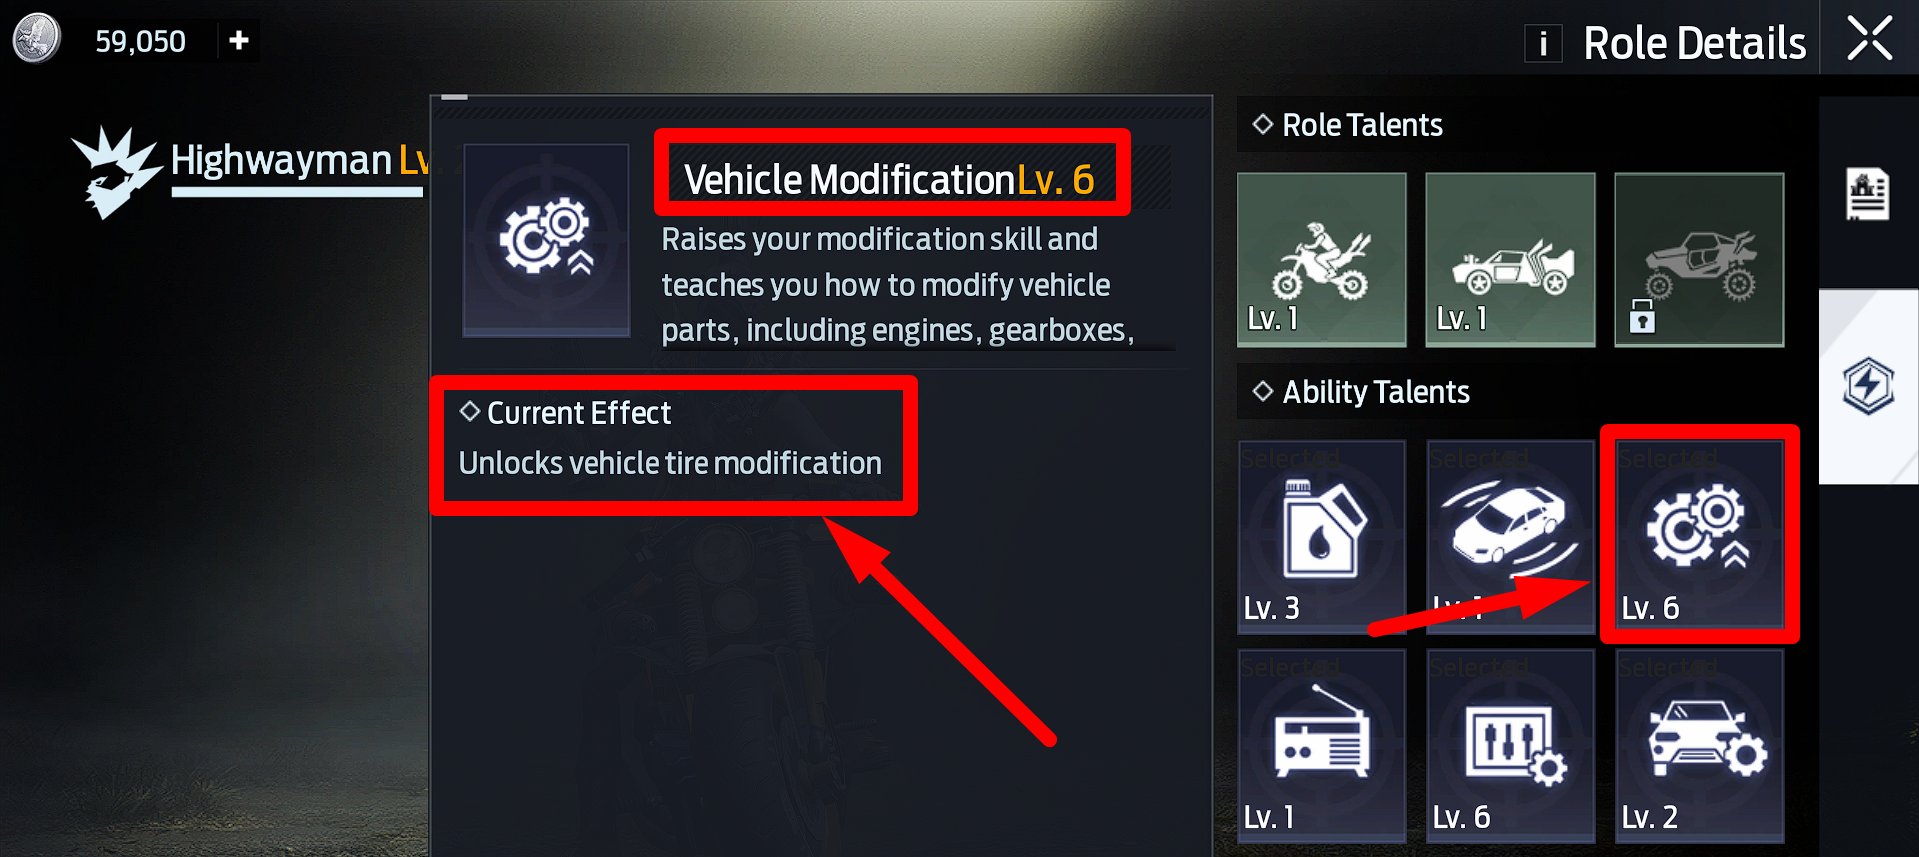
Modifications can be made in the Vehicle → Modify section. You can install various parts (e.g., Engine) that are sold in the Esc → Market → Race Extravaganza for Race Extravaganza Points. This will improve your vehicle’s core characteristics: Top Speed, Brake, Nitrogen, Boost, and Control.
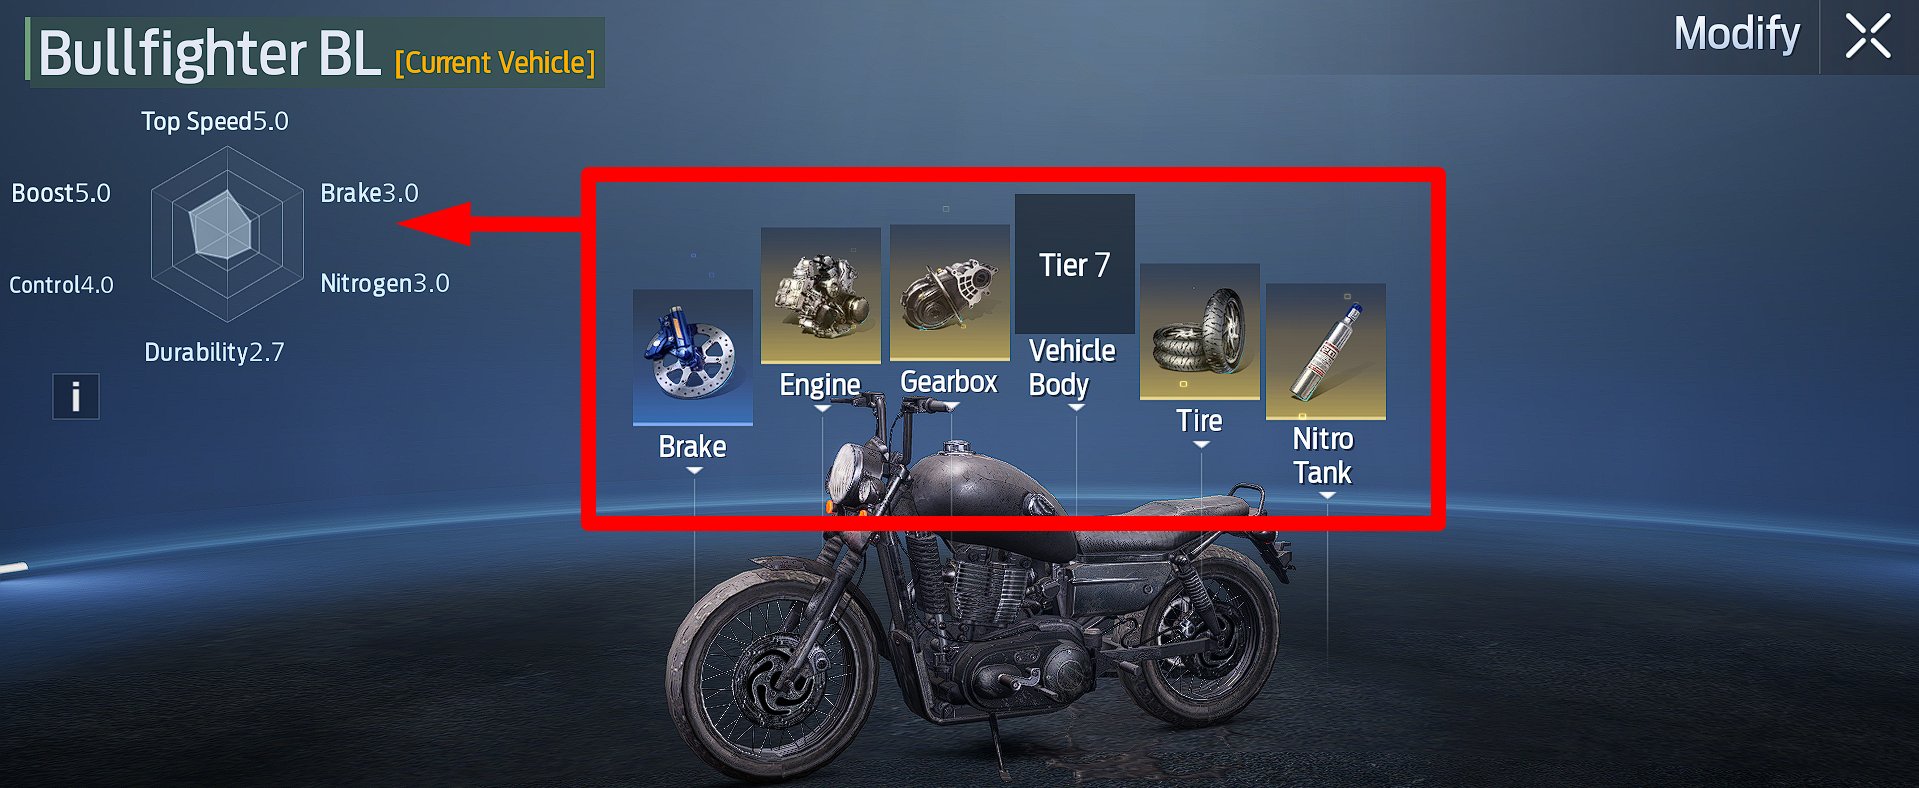
You can also reinforce the Vehicle Body using Carbon Fiber Powder (sold in the Market → Raven Shop for 100 Silver). This will increase your vehicle’s Durability (making it more resistant to damage) and increase the damage caused by collisions involving your vehicle.

Vehicle Tuning
Vehicle tuning in Undawn is quite complex and not fully understood. Therefore, please read the following information carefully before attempting to tune your cars and motorcycles.
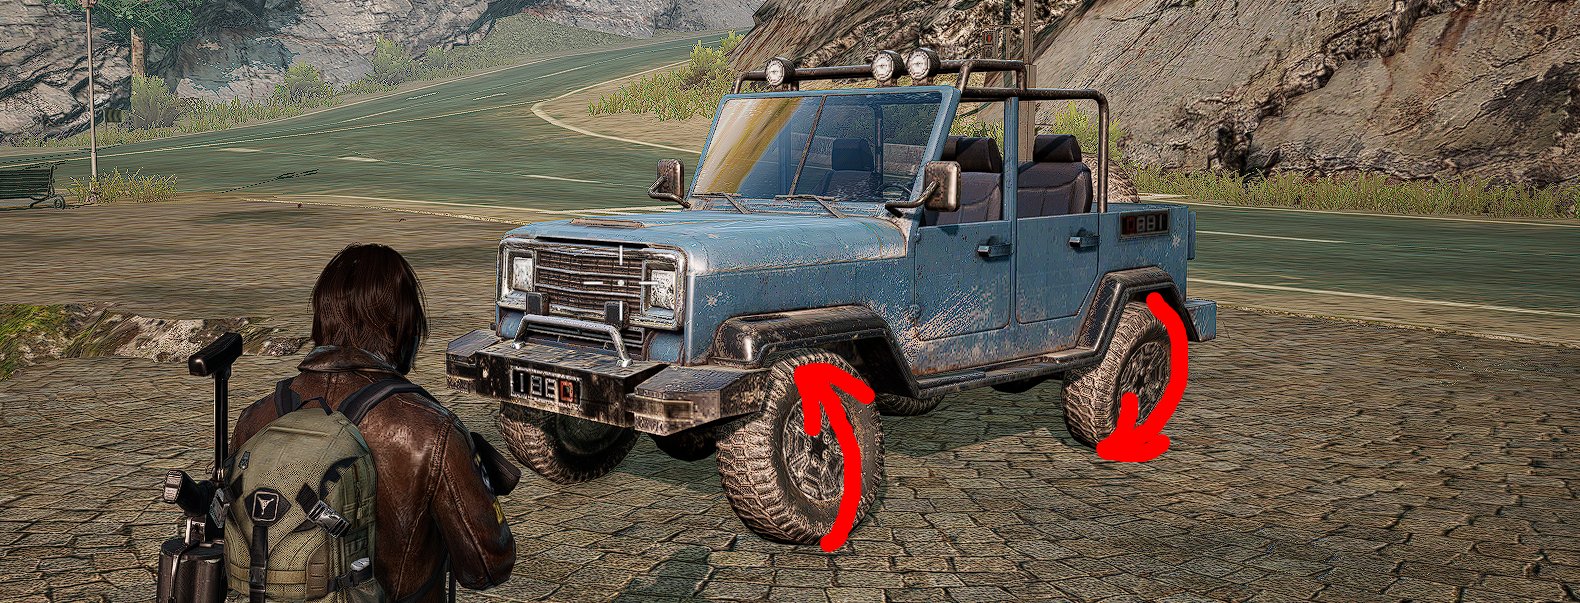
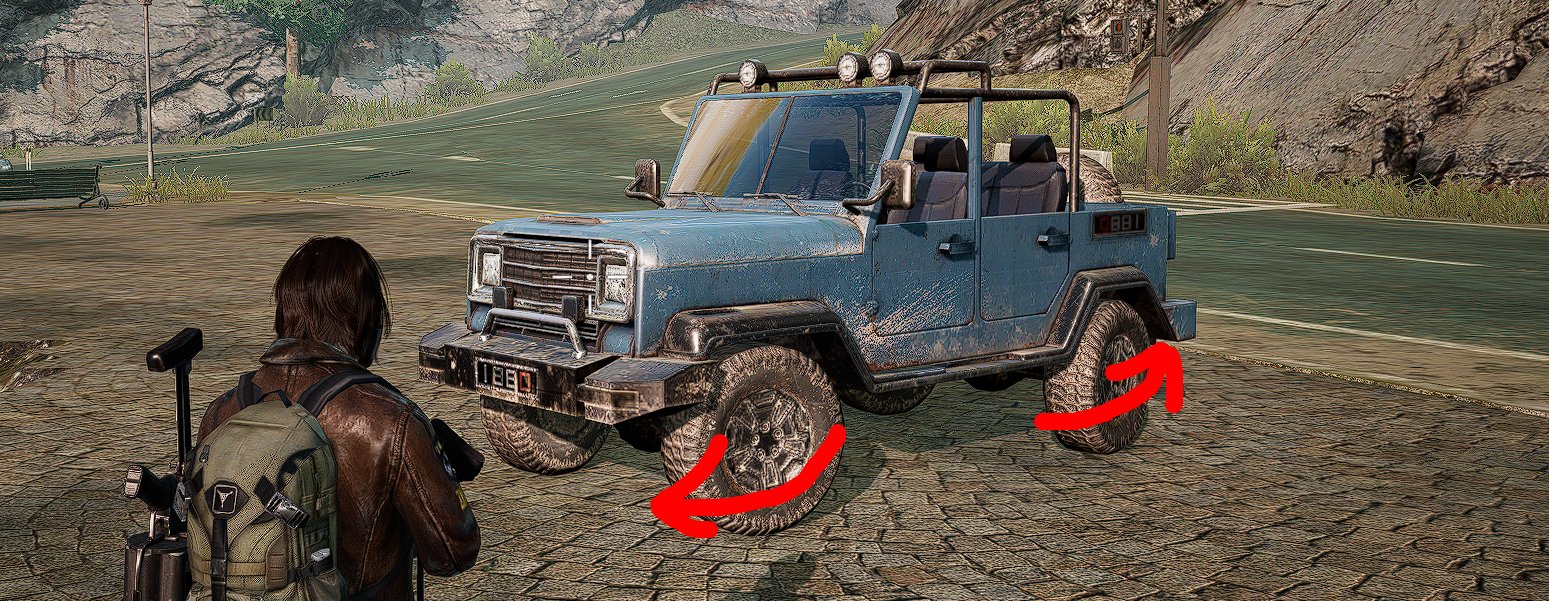
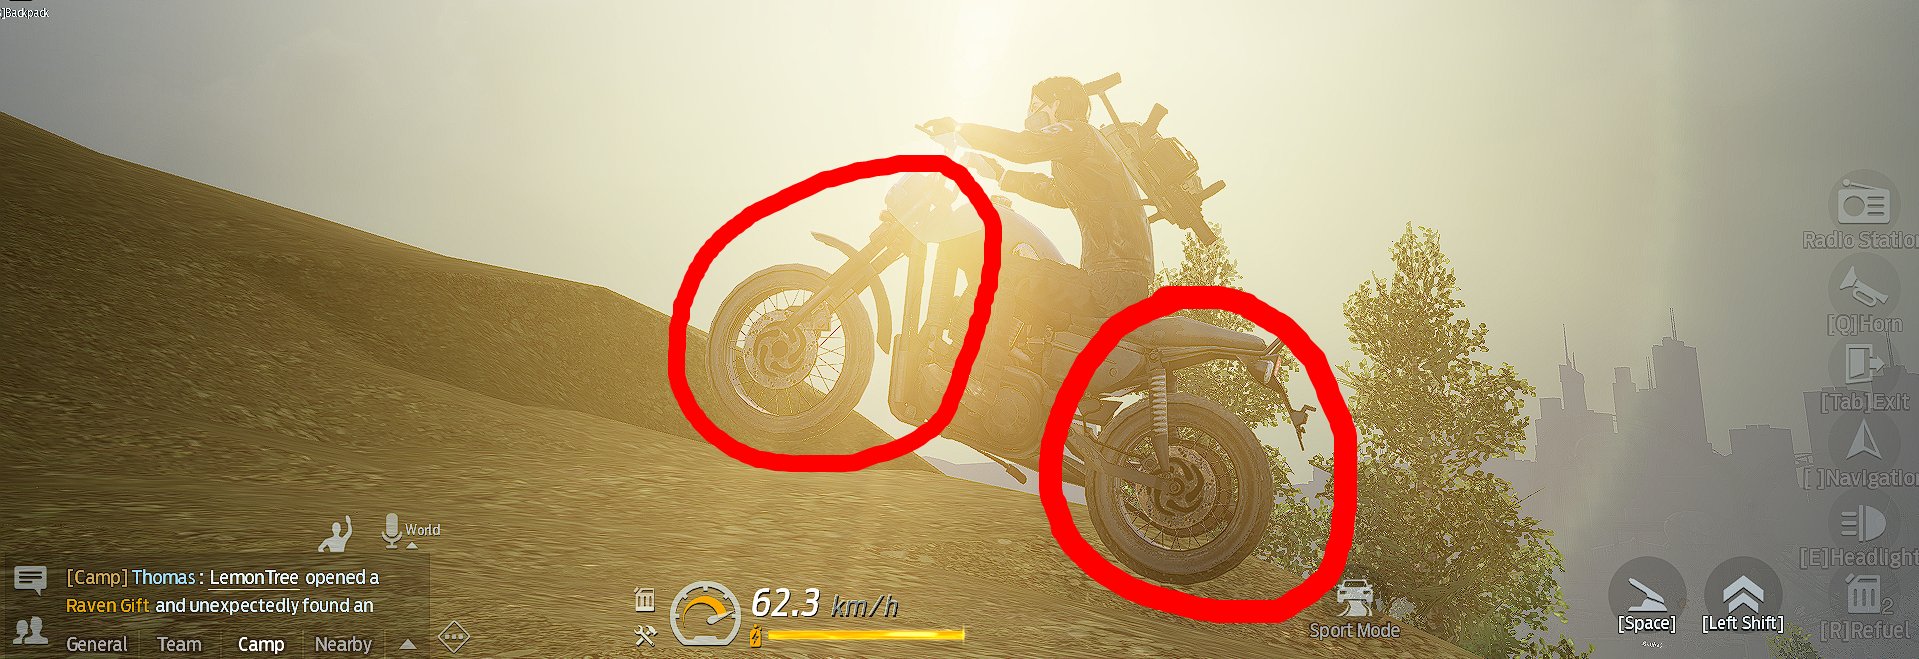
The first thing you need to know is that vehicles in Undawn are all-wheel drive. This means that both the front and rear wheels provide traction.
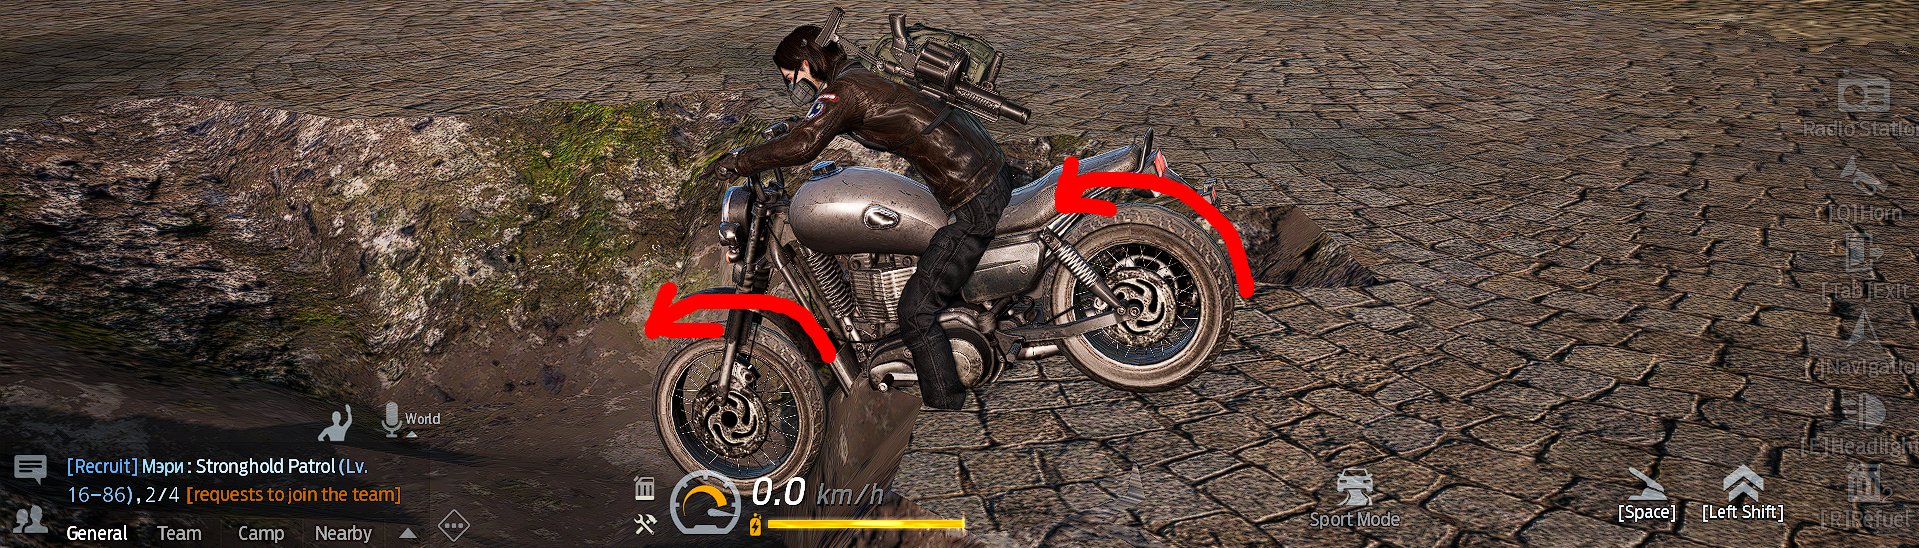
You can easily verify this by isolating the front or rear wheels of your car / motorcycle by hanging them off any ledge. This is crucial for understanding how to properly tune your vehicle.
Below is a list of vehicle parameters that you can adjust, along with explanations of how they work. This information is based solely on my testing and is presented as “how I understood it,” so it may not be entirely accurate.
PLEASE NOTE that at the extreme (maximum and minimum) values of some vehicle parameters, your vehicle may stop summoning altogether in the current game version. This is a bug that (hopefully) will be fixed soon.
Tire Pressure
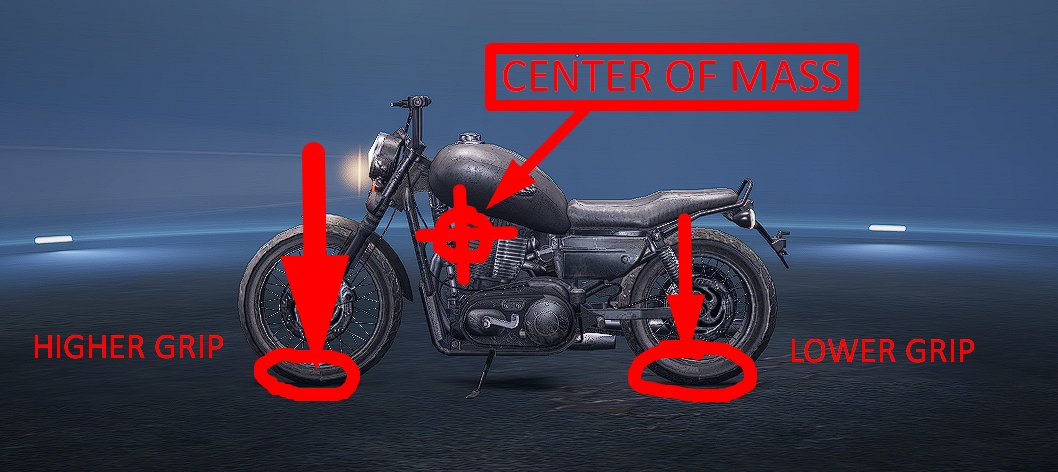
Tire pressure is responsible for the grip of your vehicle’s tires with the surface it’s driving on. Low tire pressure provides stronger grip, while high tire pressure results in weaker grip.
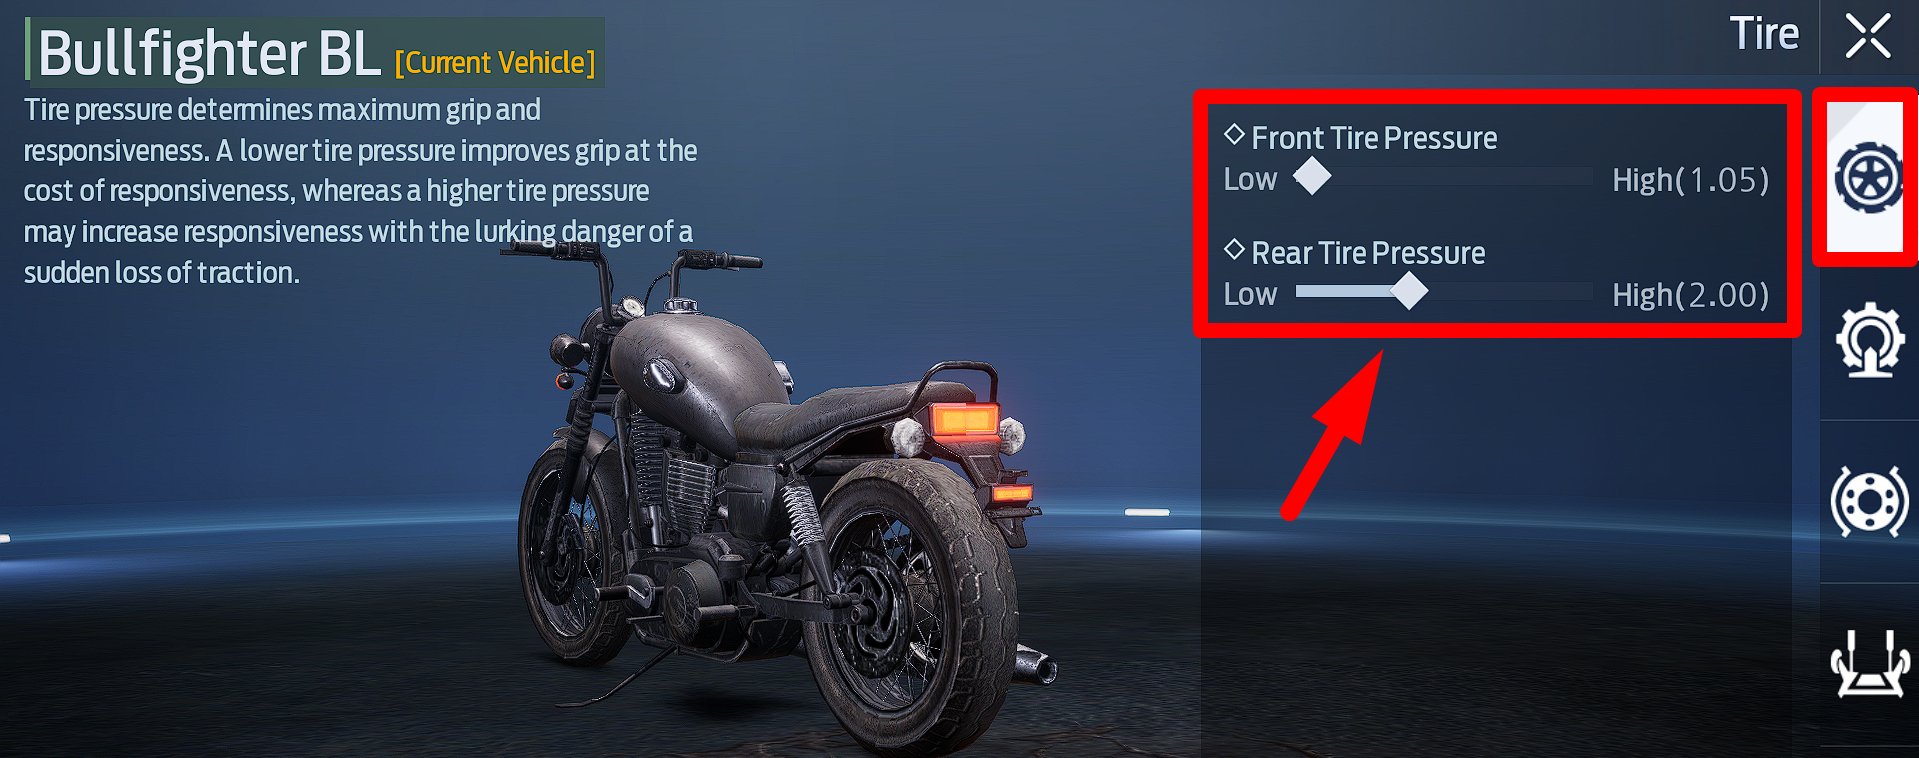
In practice (logically speaking), this means that with low tire pressure, your vehicle will accelerate more quickly, lose less speed during sharp turns, and have better braking. I spent quite a bit of time testing all of this, and in my experience, it does indeed work this way.
The optimal level of tire pressure depends on the location of your vehicle’s center of mass (more on that below). There is no “right” choice, only what feels comfortable to you.
For example, if the center of mass is in the front of your car, it makes sense that the front wheels have a higher grip because they bear more of the vehicle’s weight, right? Knowing this, you can increase the pressure in the front tires and decrease it in the rear to balance the grip between the front and rear wheels. Alternatively, you can lower the pressure in the front tires and increase it in the rear to emphasize front-wheel drive; this significantly improves your vehicle’s responsiveness when turning during driving.

In any case, remember that the more the center of mass presses on a wheel (if it’s in the rear, it presses on the rear wheels more; if it’s in the front, it presses on the front wheels more), the stronger the effect of changing the tire pressure of that wheel will be.
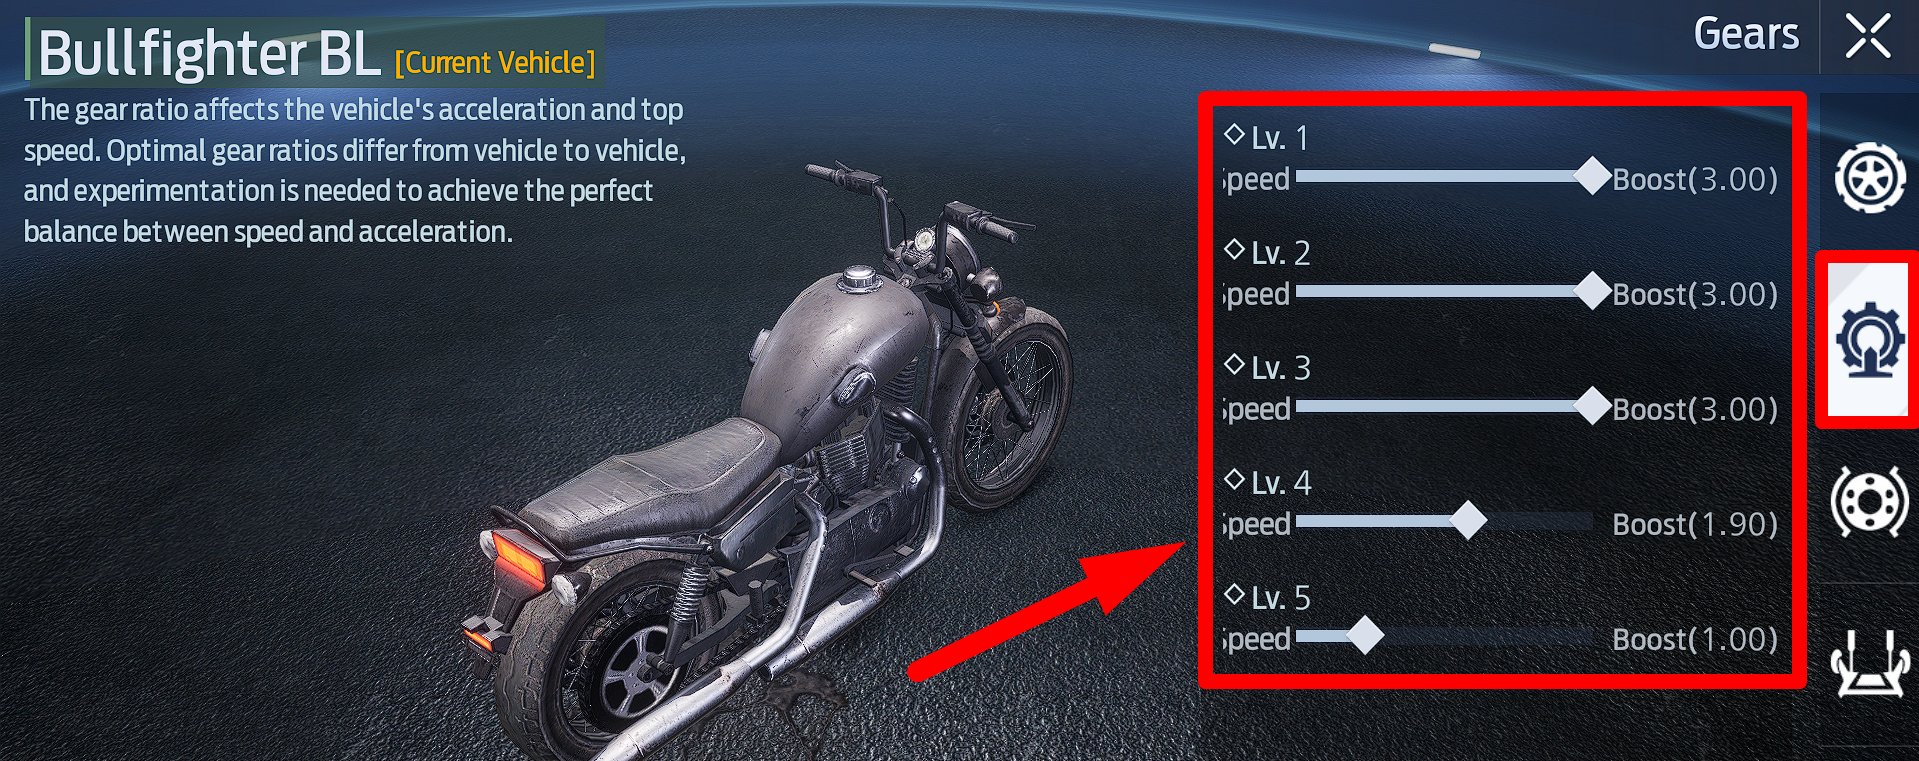
Gears
From what I understand, vehicles in Undawn have 5 gears, represented as levels 1-5 in the “Gears” section. Therefore, you can choose what’s more important for each gear: acceleration or maximum speed.
You probably won’t disagree if I assume that you want to get moving as quickly as possible after summoning your vehicle and accelerate as fast as you can. This is crucial, for example, in the “Blockade” mode when you need to quickly escape with someone else’s crates in your inventory.
That’s why I recommend setting the first 2-3 gears to the maximum “Boost” value and gradually decreasing the values of the remaining gears in favor of “Top Speed.” This way, you’ll start and accelerate as quickly as possible and then gradually increase your maximum speed.
Wheel Alignment (cars only)
The “Chassis Height” parameter determines how high the chassis of the car will be relative to the wheels. The lower the chassis, the faster the car will go, but it will be much less comfortable when driving off-road. In my experience, a value of 6.00-6.50 is quite comfortable for most situations.
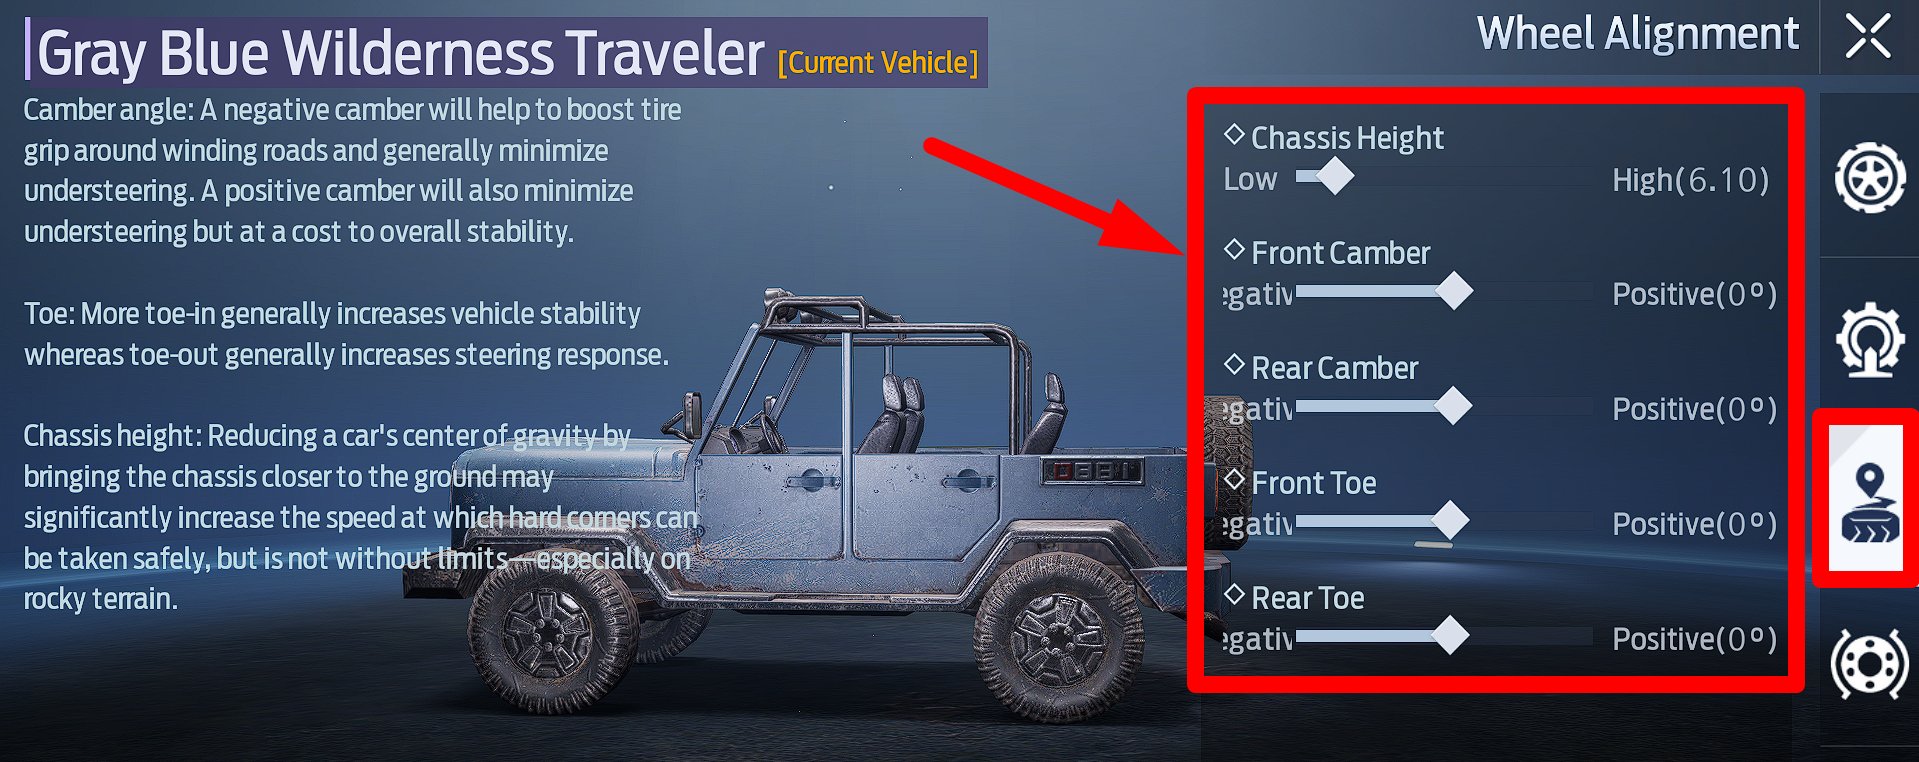
The “Front Camber” and “Rear Camber” parameters actually tilt the car’s wheels by +/-10 degrees along the vertical axis.
The “Front Toe” and “Rear Toe” parameters tilt the car’s wheels by +/-10 degrees along the horizontal axis.
I recommend leaving all these values at 0 degrees because my tests have shown that any change in the angle of the tires relative to the ground results in reduced grip and acceleration. Perhaps on top-tier cars, this feels different, but for my free-to-play off-roader, they only do harm.
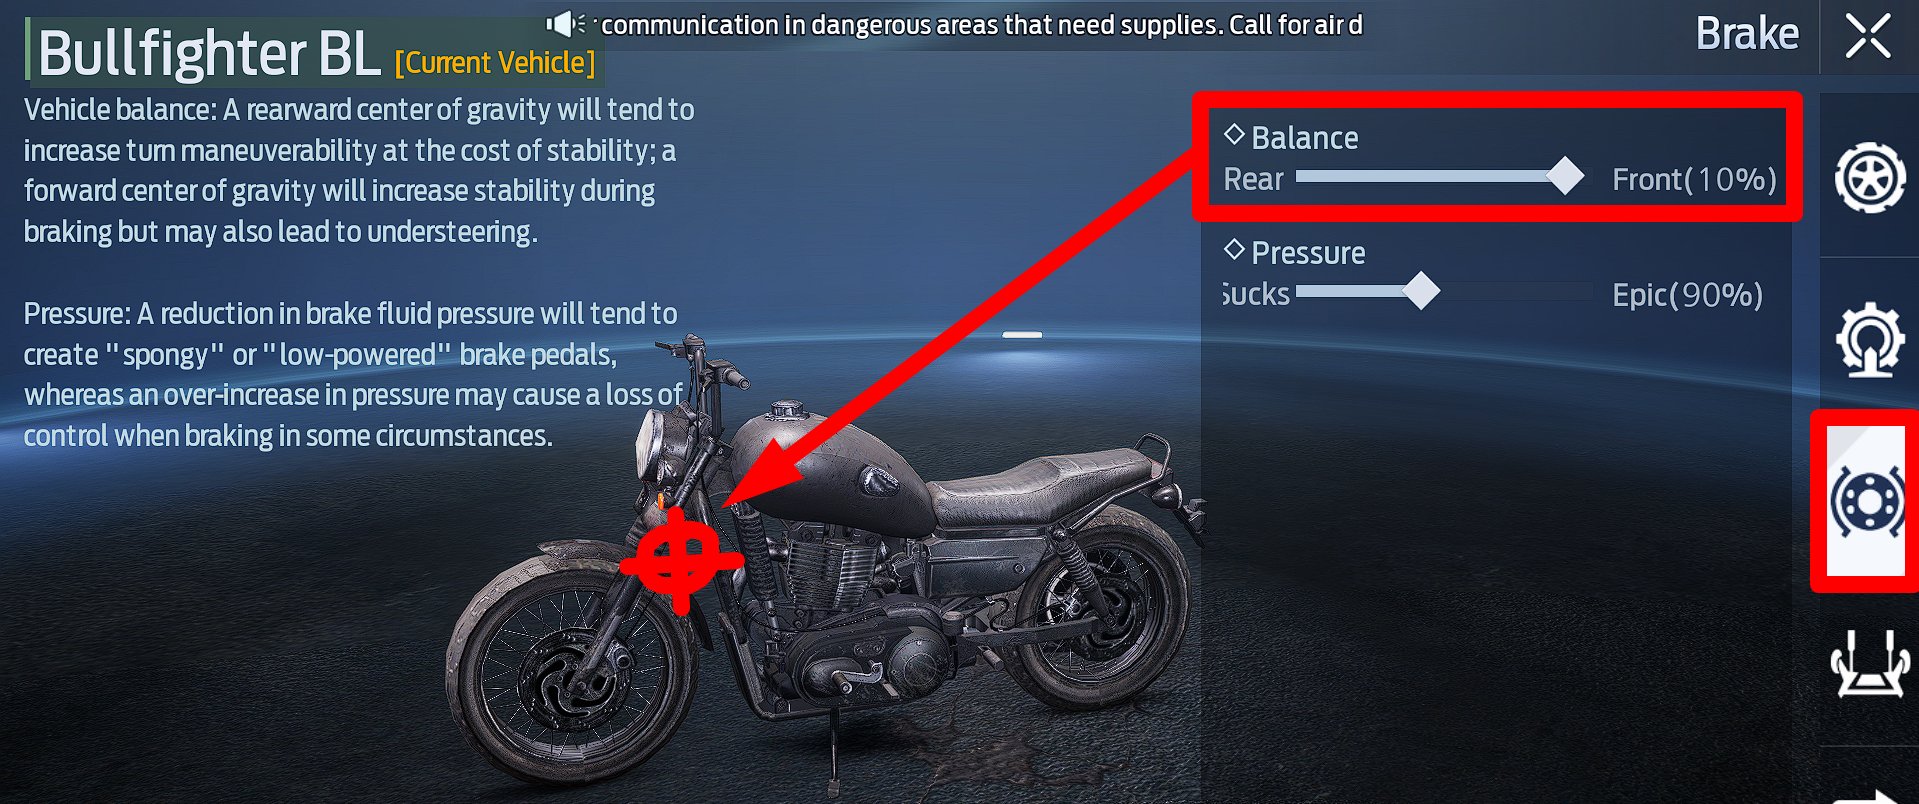
Brake
The “Balance” parameter controls the position of your vehicle’s center of mass (as mentioned earlier). If the center of mass is in the front, it exerts more pressure on the front wheels. If the center of mass is in the rear, it exerts more pressure on the rear wheels. The more the center of mass presses on the wheels, the higher their grip with the surface.
In practice, this means that the wheels on which the center of mass exerts more pressure will have a more significant impact on the behavior of your car/motorcycle. For example, if you shift the center of mass to the rear of the vehicle, the car will skid significantly during rapid changes in direction, and you’ll lose a lot of speed because of the low grip of the front wheels (which also contribute to moving the vehicle forward).
If you shift the center of mass to the front of the car, you’ll be able to change direction more comfortably while driving. The car won’t skid as much, and you’ll lose less speed during turns. This occurs because the main traction is on the front wheels (the center of mass exerts more pressure on them, increasing their grip with the surface, and thus, they have a greater influence on the vehicle’s behavior). The optimal value depends on your preferences.
The “Pressure” parameter determines how well your brakes will work (“sucks” – worse, “epic” – better). I recommend using a balanced value below 90%. Otherwise, you’ll simply lose almost all your speed with any braking (Space). The worse the brakes, the better (especially for motorcycles).
Suspension
The “Front Suspension Damping” and “Rear Suspension Damping” parameters control how soft (springy) or stiff the front and rear suspensions of your vehicle will be.
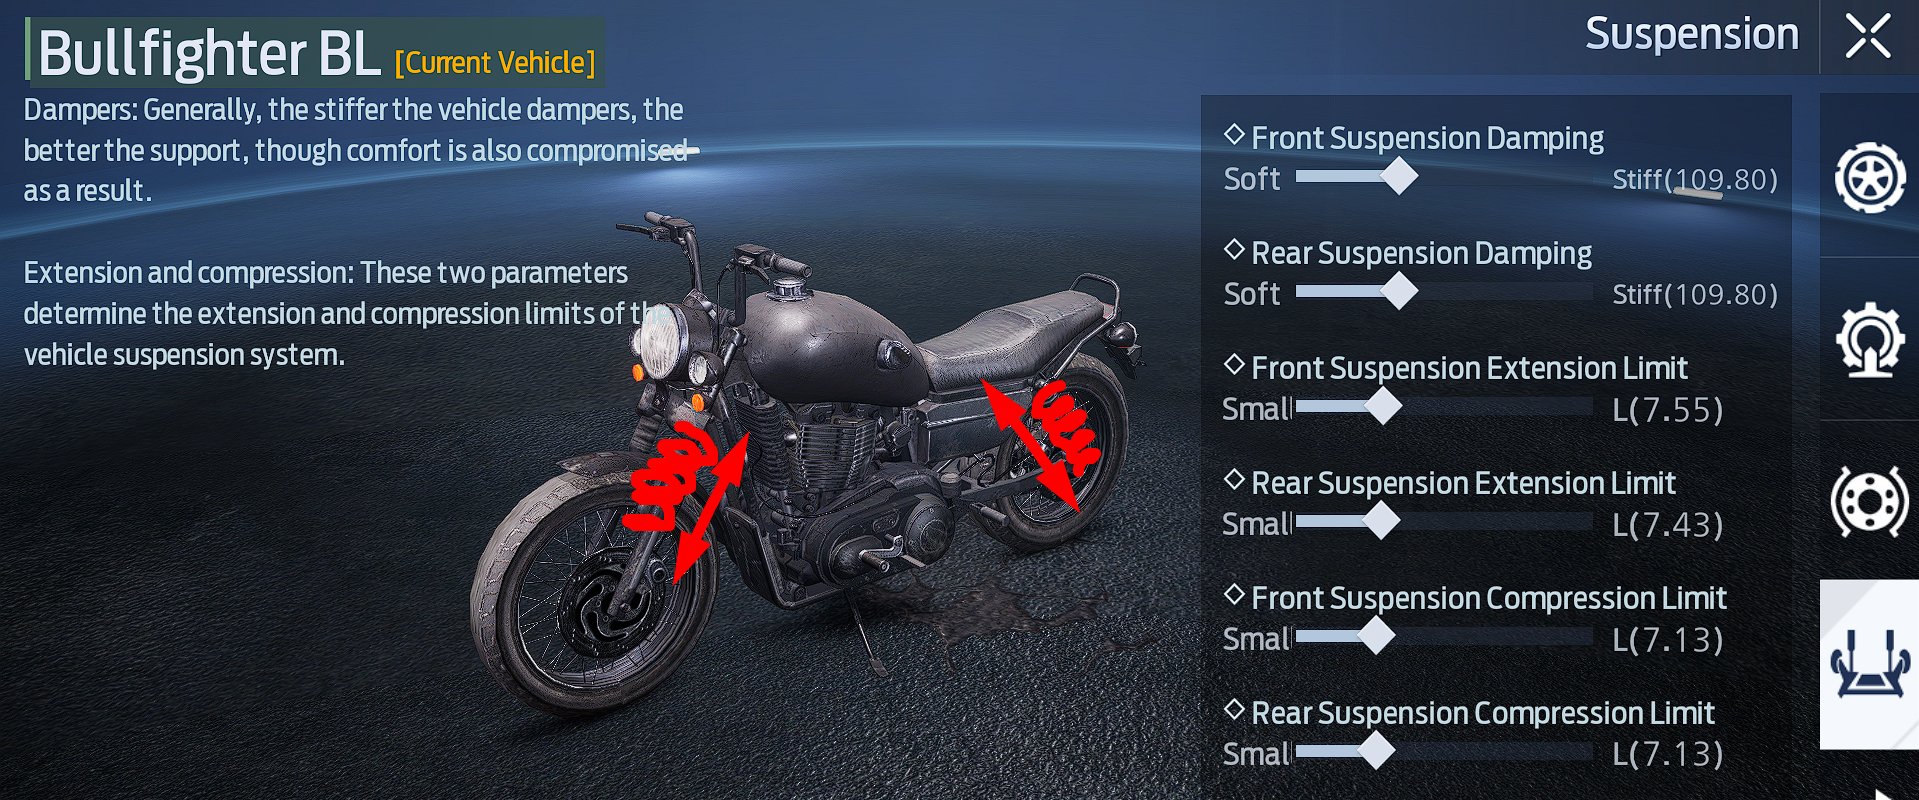
The “Extension Limit” and “Compression Limit” parameters determine how much the shock absorbers can stretch and compress.
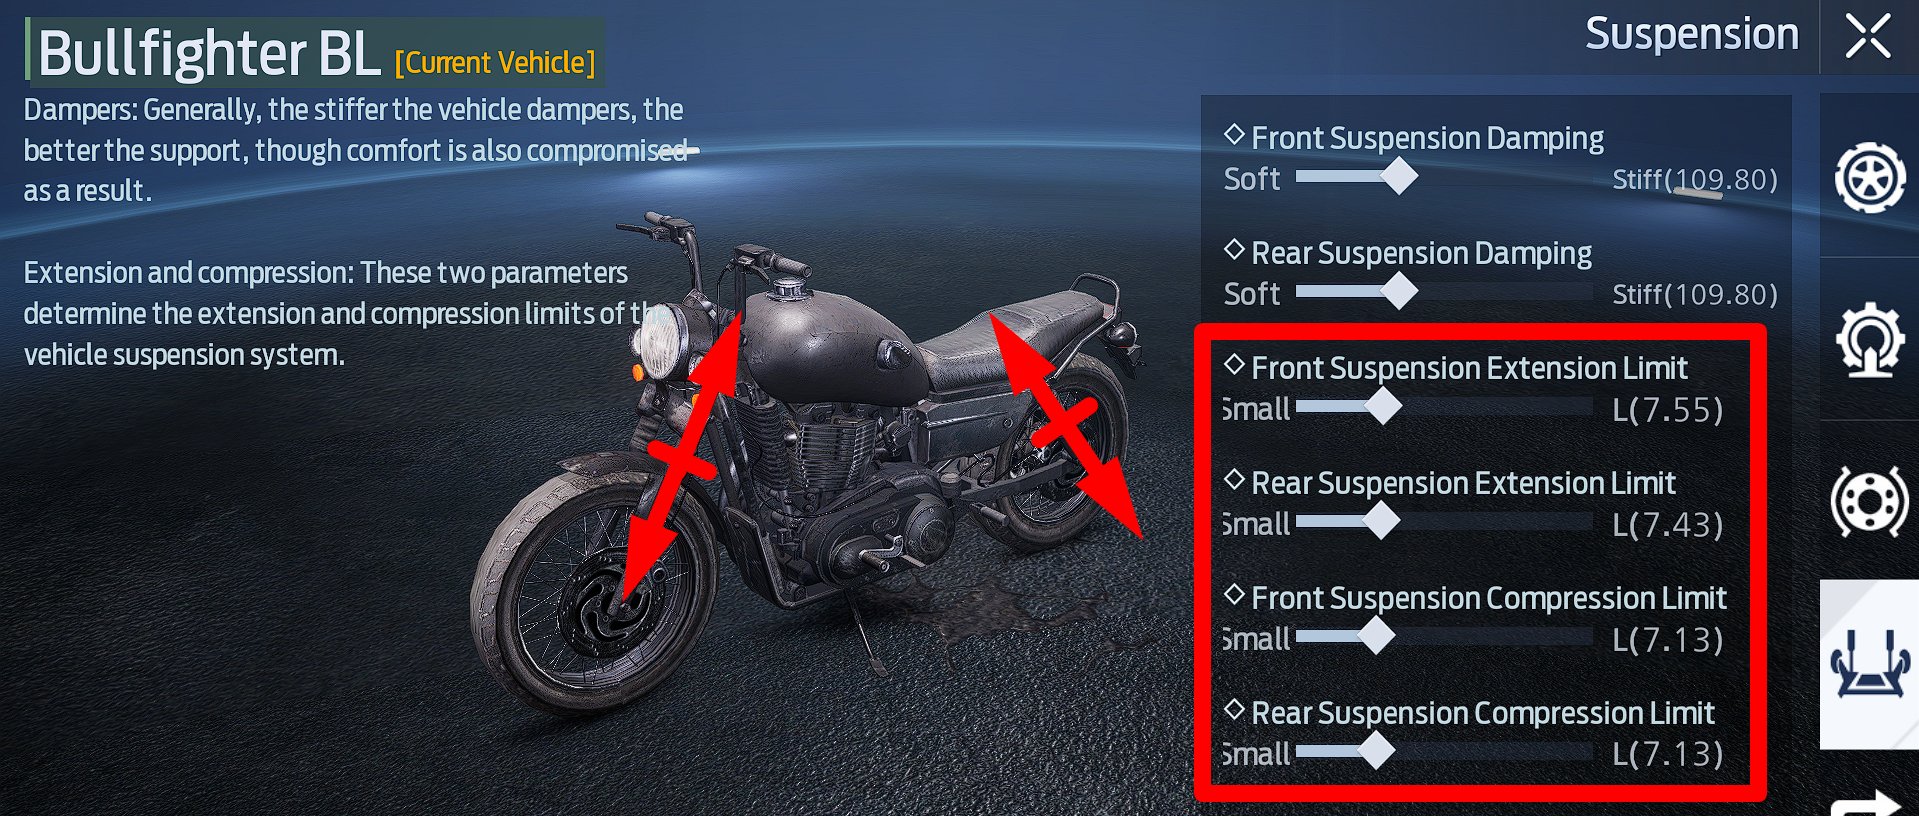
With a soft suspension and high values of Extension Limit and Compression Limit, your vehicle will bounce heavily on any uneven surfaces and even jump slightly upon landing due to inertia.
I recommend using a balanced suspension (130-150) with reduced values of Extension Limit and Compression Limit. This will provide comfortable driving on almost any surface.
Steering
The “Maximum Turning Angle” parameter sets the maximum angle to which you can turn the wheel to steer the vehicle.
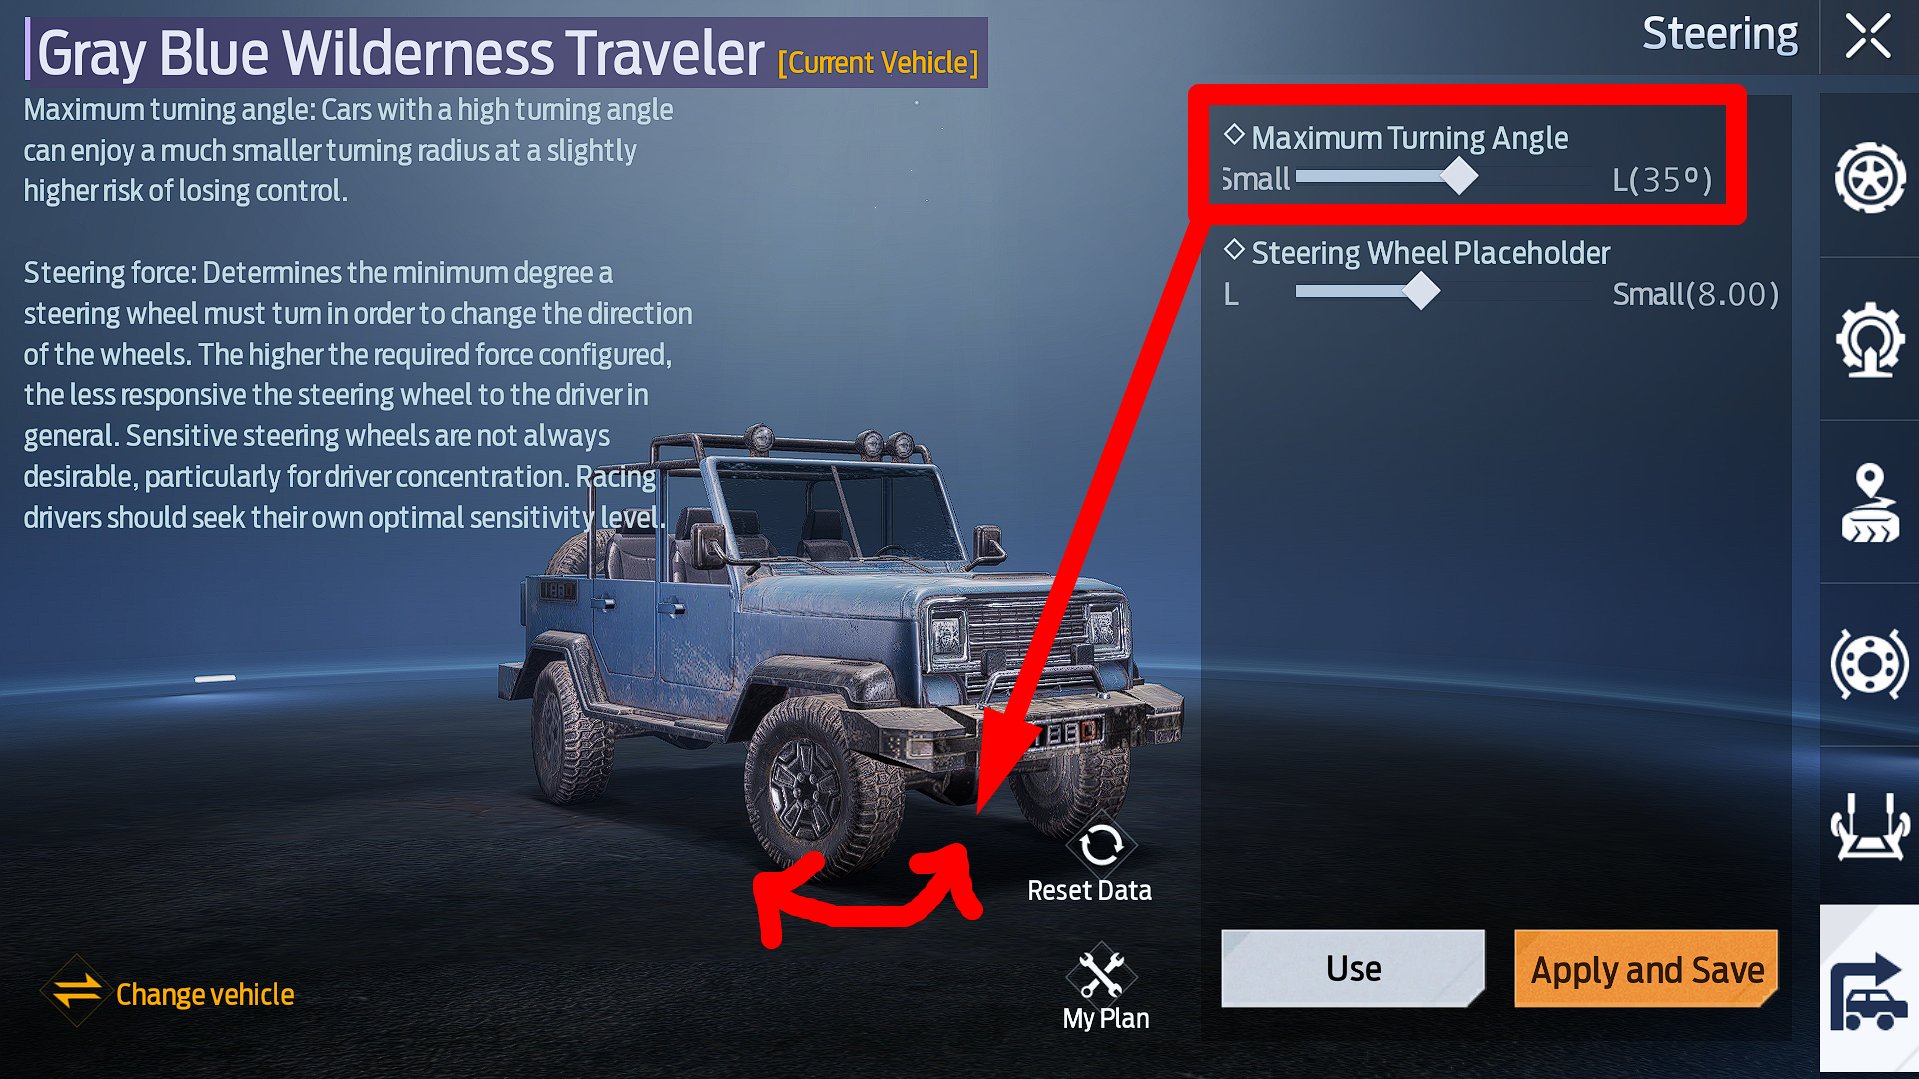
The higher this angle, the sharper the turn will be, and the more speed you’ll lose during such a turn. I recommend using balanced values and even lowering the angle to 37-38 degrees. This will provide a smooth and comfortable turn at high speeds.
I couldn’t thoroughly test the impact of the “Steering Wheel Placeholder” parameter (only available for cars). I recommend leaving it at a moderate value. Perhaps on faster vehicles, its impact is more noticeable.
Ready Tuning Schemes for Vehicles in Undawn
I’ve prepared comfortable tuning schemes for low-powered, free-to-play motorcycles and cars in Undawn. When creating these schemes, I aimed to achieve the following:
- Maximum acceleration.
- The ability to change direction rapidly with minimal speed loss, possibly allowing for slight drifting.
- Smooth and comfortable handling on various surfaces.
These schemes were tested on the PC version of Undawn. Optimal values may vary for other devices and different types of vehicles.
Ready Tuning Scheme for Motorcycles
- Front Tire Pressure = 1.05
- Rear Tire Pressure = 2.00
- Gears Lv. 1, Lv. 2, Lv. 3 = 3.00
- Gears Lv. 4 = 1.90
- Gears Lv. 5 = 1.00
- Balance = 15-5% (center of mass at the front)
- Pressure = 60-90% (poor brakes)
- Front Suspension Damping = 130-150
- Rear Suspension Damping = 130-150
- Extension Limits = 7.00-7.50
- Compression Limits = 7.00-7.50
- Maximum Turning Angle = 36-37 degrees
I personally found these settings very satisfying. The motorcycle accelerates quickly, brakes smoothly, can change direction sharply, and even perform 180-degree turns with relatively minor speed loss.
Ready Tuning Scheme for Cars
- Front Tire Pressure = 1.40
- Rear Tire Pressure = 1.70
- Gears Lv. 1, Lv. 2, Lv. 3 = 6.00
- Gears Lv. 4 = 4.00
- Gears Lv. 5 = 2.00
- Chassis Height = 6.00-6.20
- Camber and Toe (all) = 0 degrees
- Balance = 20% (center of mass at the front)
- Pressure = 60-90% (poor brakes)
- Front Suspension Damping = 130-150
- Rear Suspension Damping = 130-150
- Extension Limits = 7.00-7.50
- Compression Limits = 7.00-7.50
- Maximum Turning Angle = 35-36 degrees
- Steering Wheel Placeholder = 8.00
This scheme may not be perfect, but it works well for my Gray Blue Wilderness Traveler. I hope it proves useful to you as well.